
In this blog, we'll explore step-by-step guidelines on how to effectively manage refunds using Odoo 17 Accounting.
Managing refunds is a crucial element of any business that involves customer transactions. Effectively handling refunds not only ensures customer satisfaction but also upholds the financial well-being of your organization. Odoo 17 Accounting, a powerful ERP solution, offers a complete array of tools to streamline the refund process.
Odoo Accounting is an indispensable tool for businesses looking to refine and optimize their refund management processes. With its seamless integration, automated processing, transparent tracking, customer-focused communication, compliance measures, top-notch security features, and enhanced user experience, Odoo Accounting offers a comprehensive solution for establishing a robust and efficient refund management system. By choosing Odoo Accounting, businesses can streamline their financial operations and provide a customer-centric approach to managing refunds with ease.
- Refund Options in Odoo 17
When it comes to refund management in Odoo, there are two distinct methodologies to consider. One approach involves accessing the Accounting menu and navigating to the designated "Refunds" sub-menu. This feature serves as a centralized platform for efficiently overseeing all refund transactions within your company.
Alternatively, the second method allows for the generation of refunds directly within the Purchase module. After finalizing a purchase and generating the corresponding vendor bill, an additional option becomes available: "Add Credit Note." This option serves as a convenient tool within Odoo 17, facilitating the seamless creation of refunds, thereby enhancing flexibility in managing financial transactions. Whether opting for the specialized Refunds sub-menu in the Accounting menu or utilizing the "Add Credit Note" feature in the purchase module, Odoo offers versatile solutions for efficient and tailored refund processing.
1. Refunds from the Accounting Module:
To manage Refunds in the Accounting module, log in to your Odoo account and Go to the Accounting Application > Vendors menu > Refunds
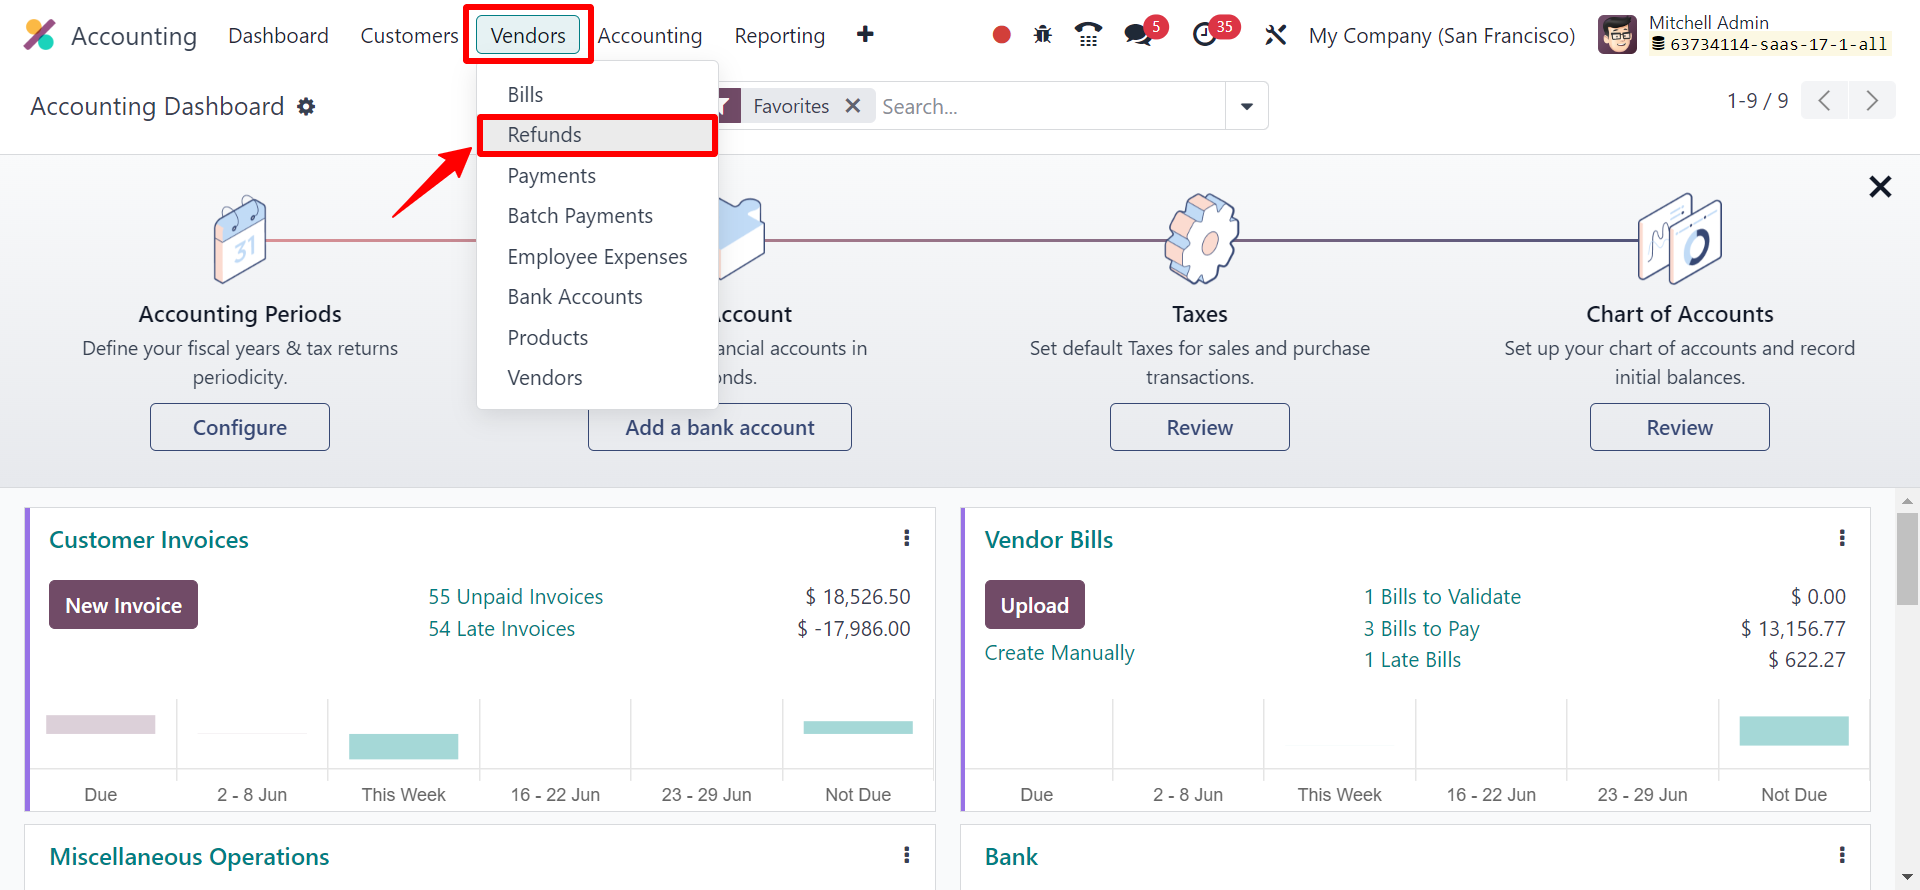
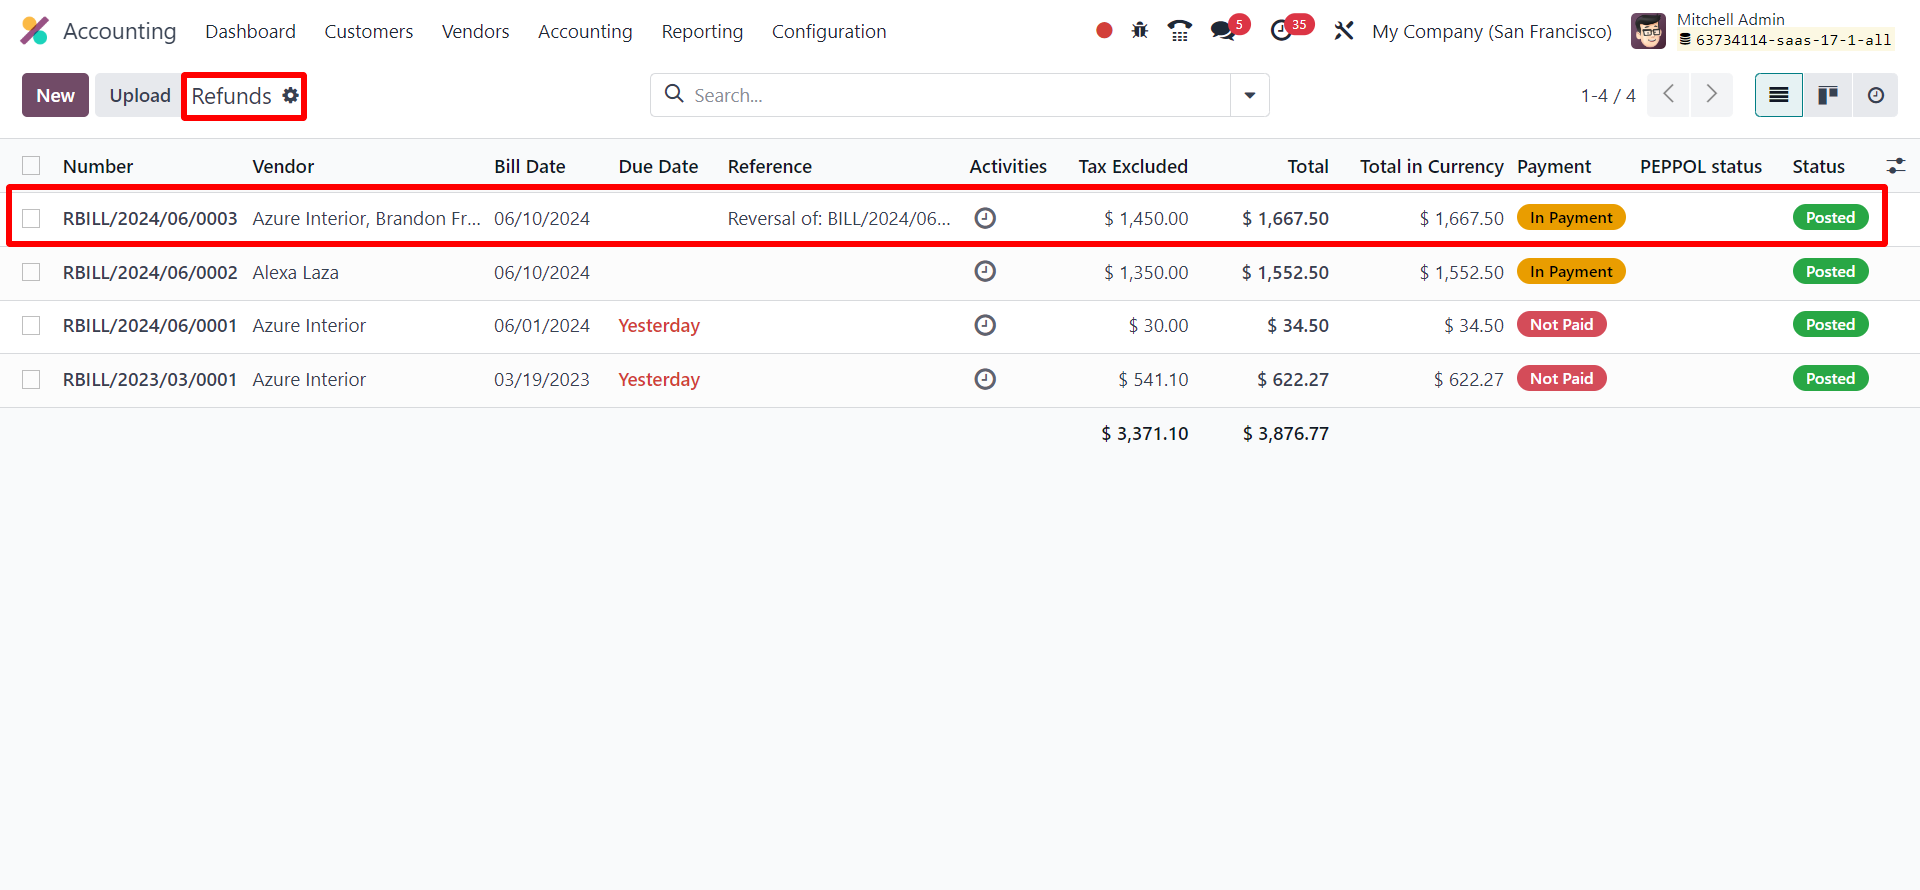
Within the Vendor menu, you can find a sub-menu labeled "Refunds." Click on this option to access the refund functionality.
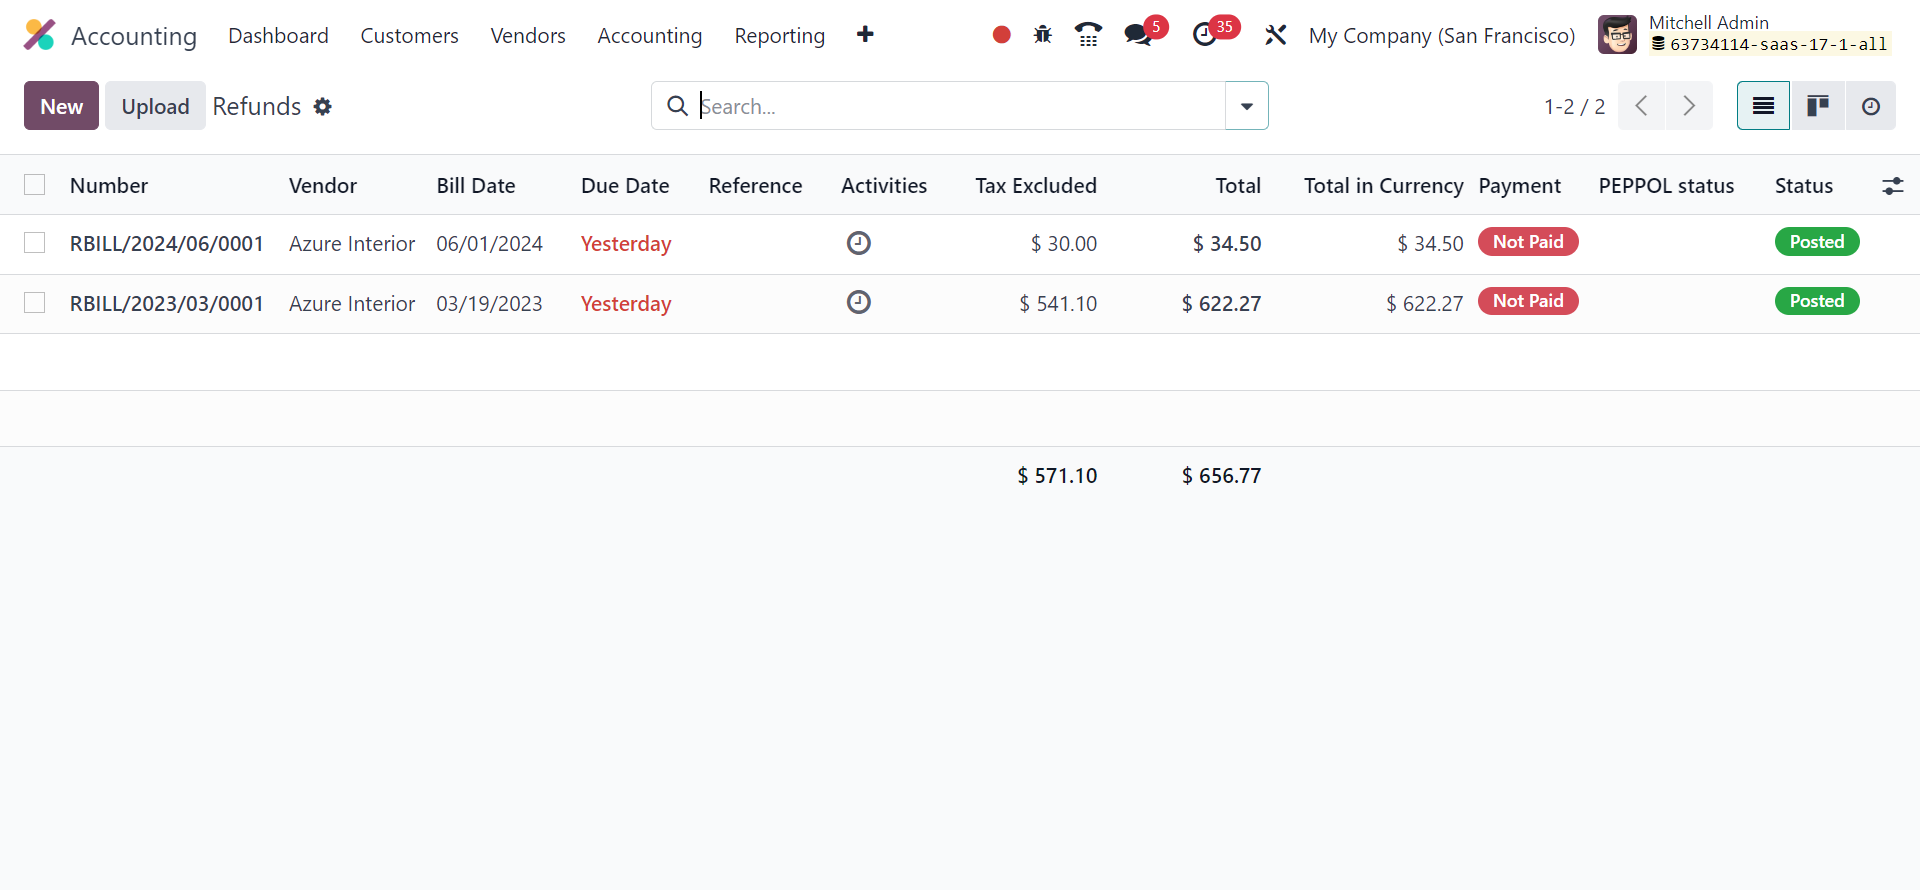
Within this section, you can easily access a comprehensive list of all refunds resulting from various purchase transactions. The refund list preview includes key information like, Refund Number, Vendor, Bill Date, Due Date, Reference, Activities, Tax Inclusion, Total Amount, Payment Status, and Refund Status. This well-organized presentation allows for a swift and effective overview of your refund activities, simplifying the management process.
To create a refund directly from the Accounting module, simply use the 'New' button provided on this platform. Additionally, the 'Upload' button is a useful feature that allows you to easily upload multiple refunds to your Odoo database at once, improving efficiency and data organization.
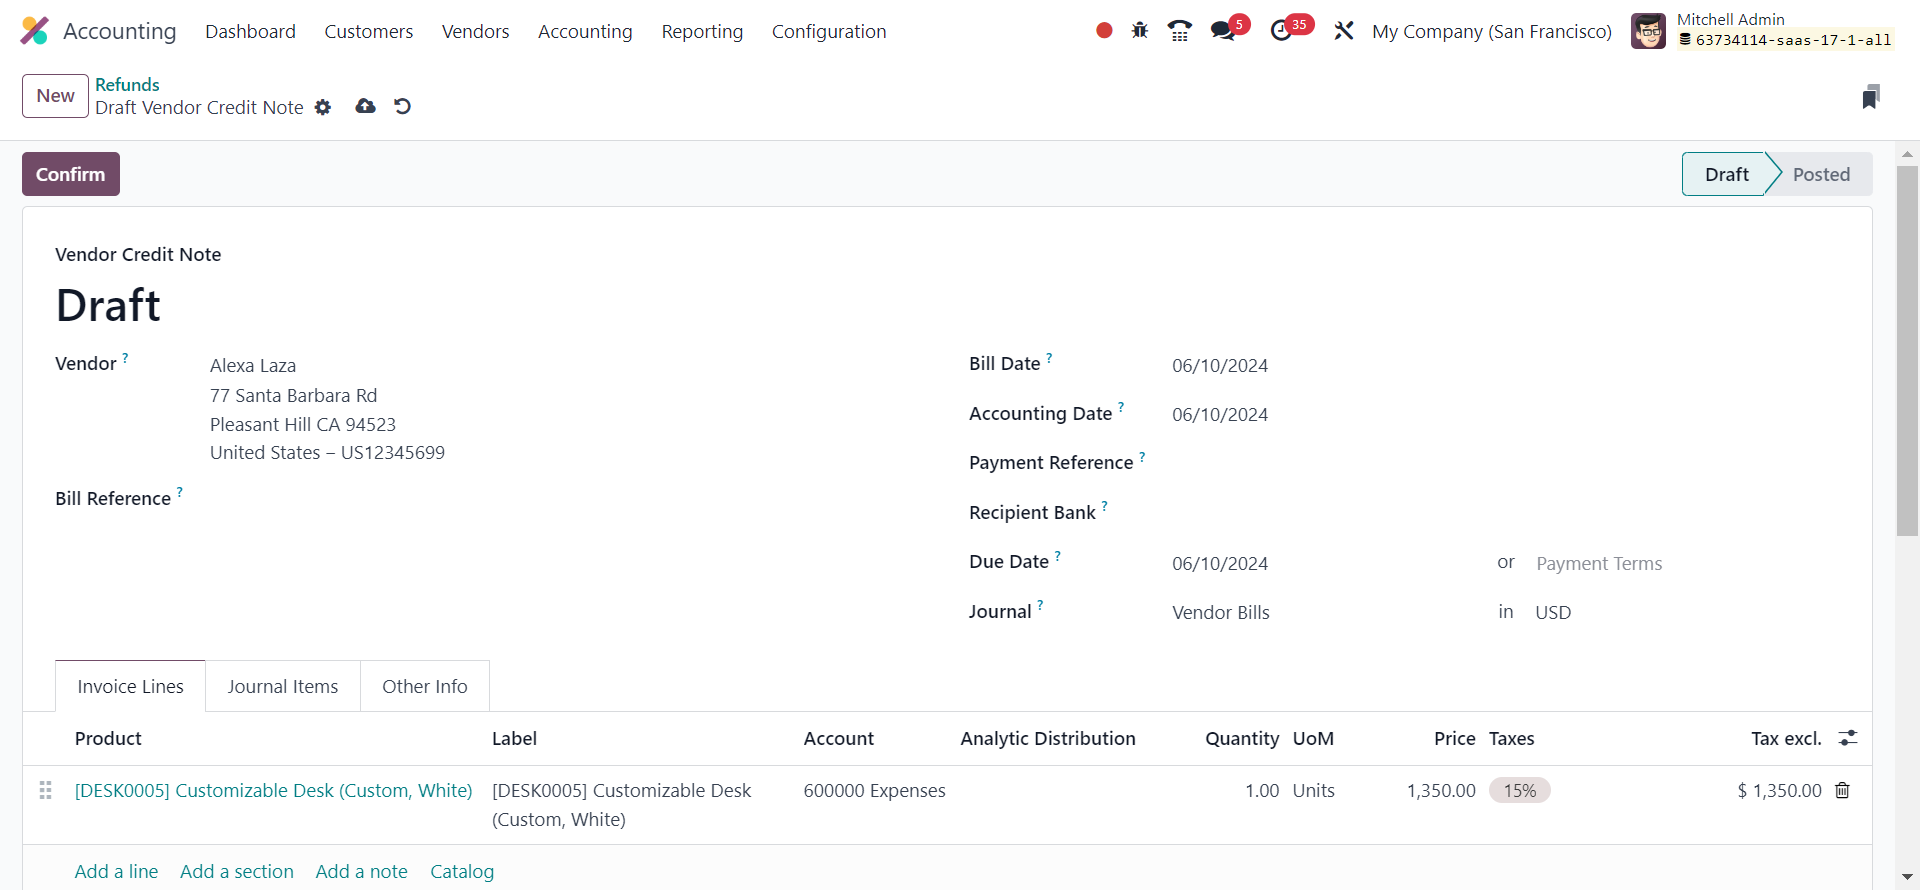
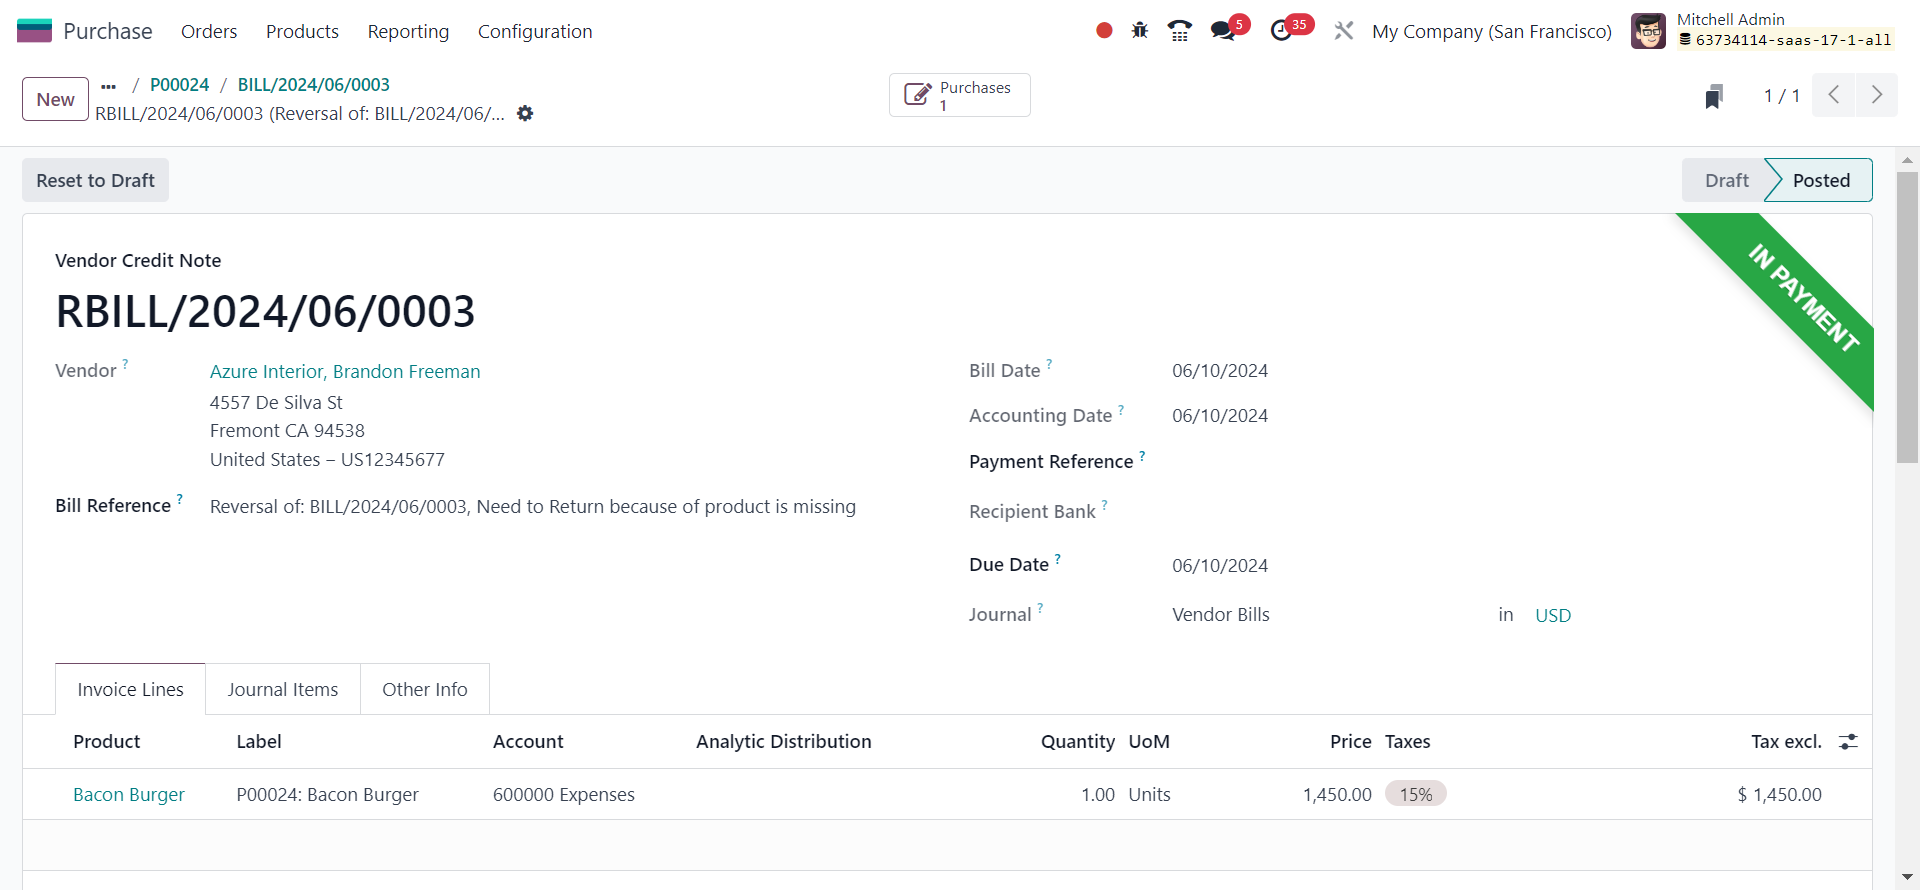
To initiate the refund process, click on the option to provide the necessary details. Select the vendor for whom you wish to process a refund. Choose the respective vendor from the list. Enter the Bill Reference in the provided space, which should correspond to the bill for a purchase requiring a refund.
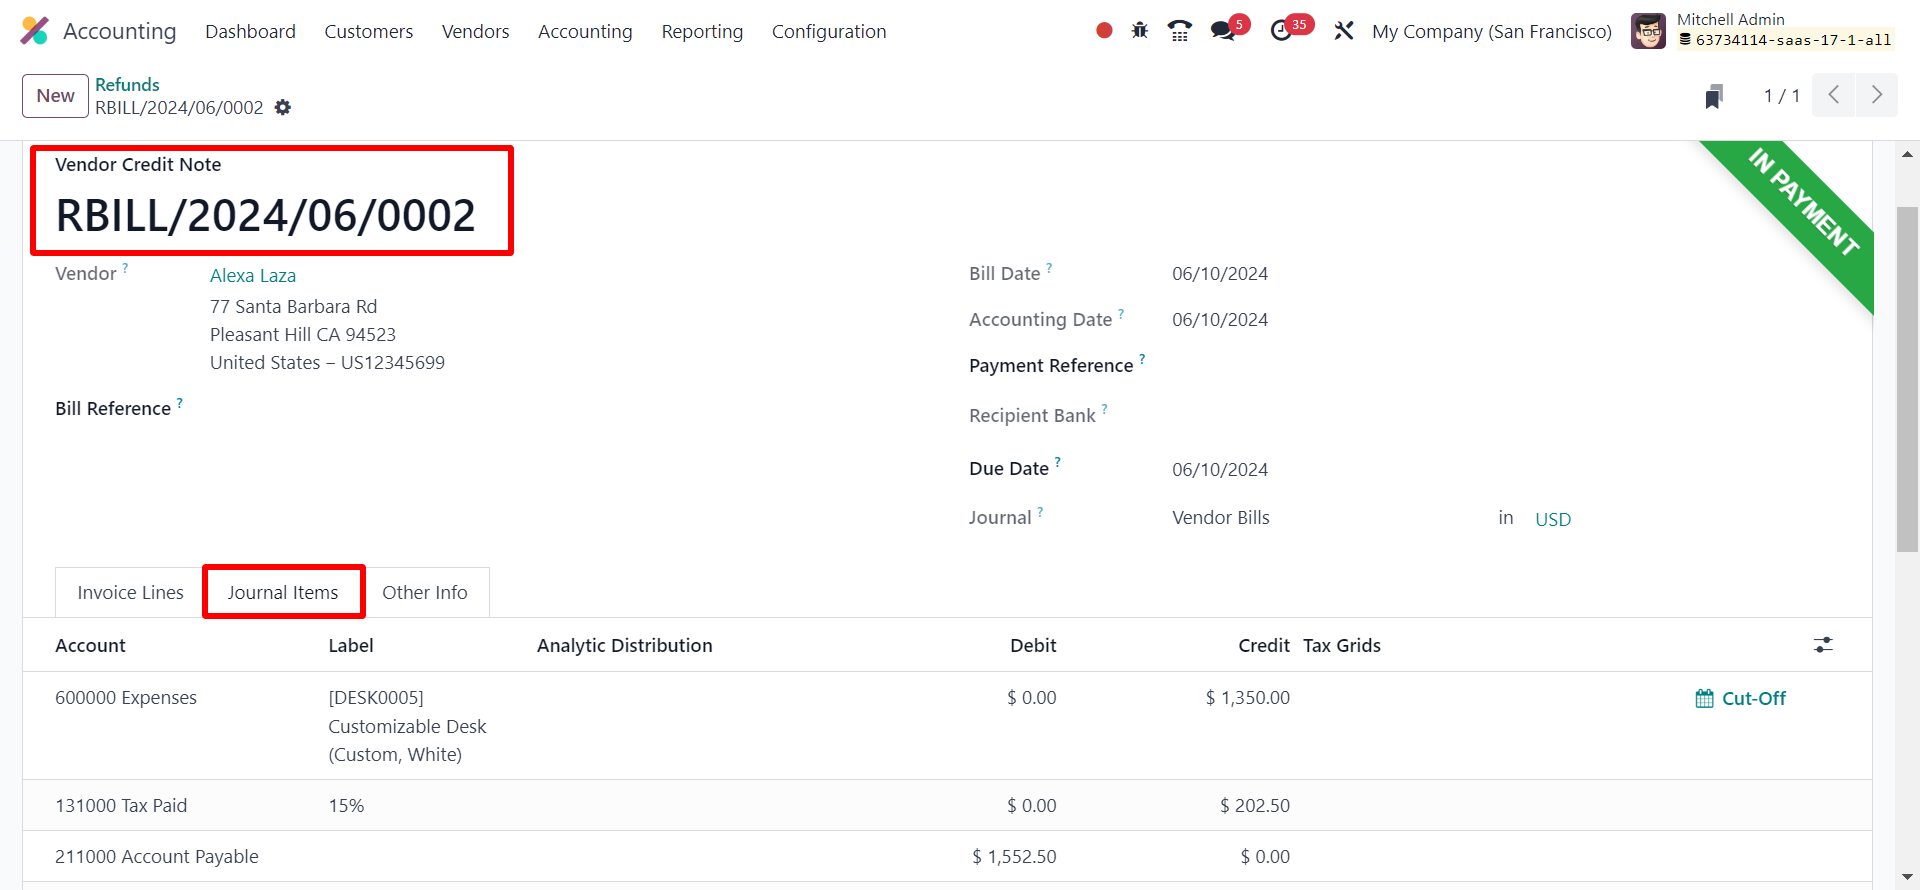
Provide the necessary refund information, such as the Bill Date, Accounting Date, Payment Reference, Recipient Bank, Payment Terms, and Journal. You can make updates to the product details in the Invoice Lines section. The Invoice Lines and Journal Items sections will automatically populate once you mention the corresponding Bill Reference for the Refund.
Check the refund details carefully for accuracy. If everything looks correct, go ahead and confirm the refund request by selecting the "Confirm" button.
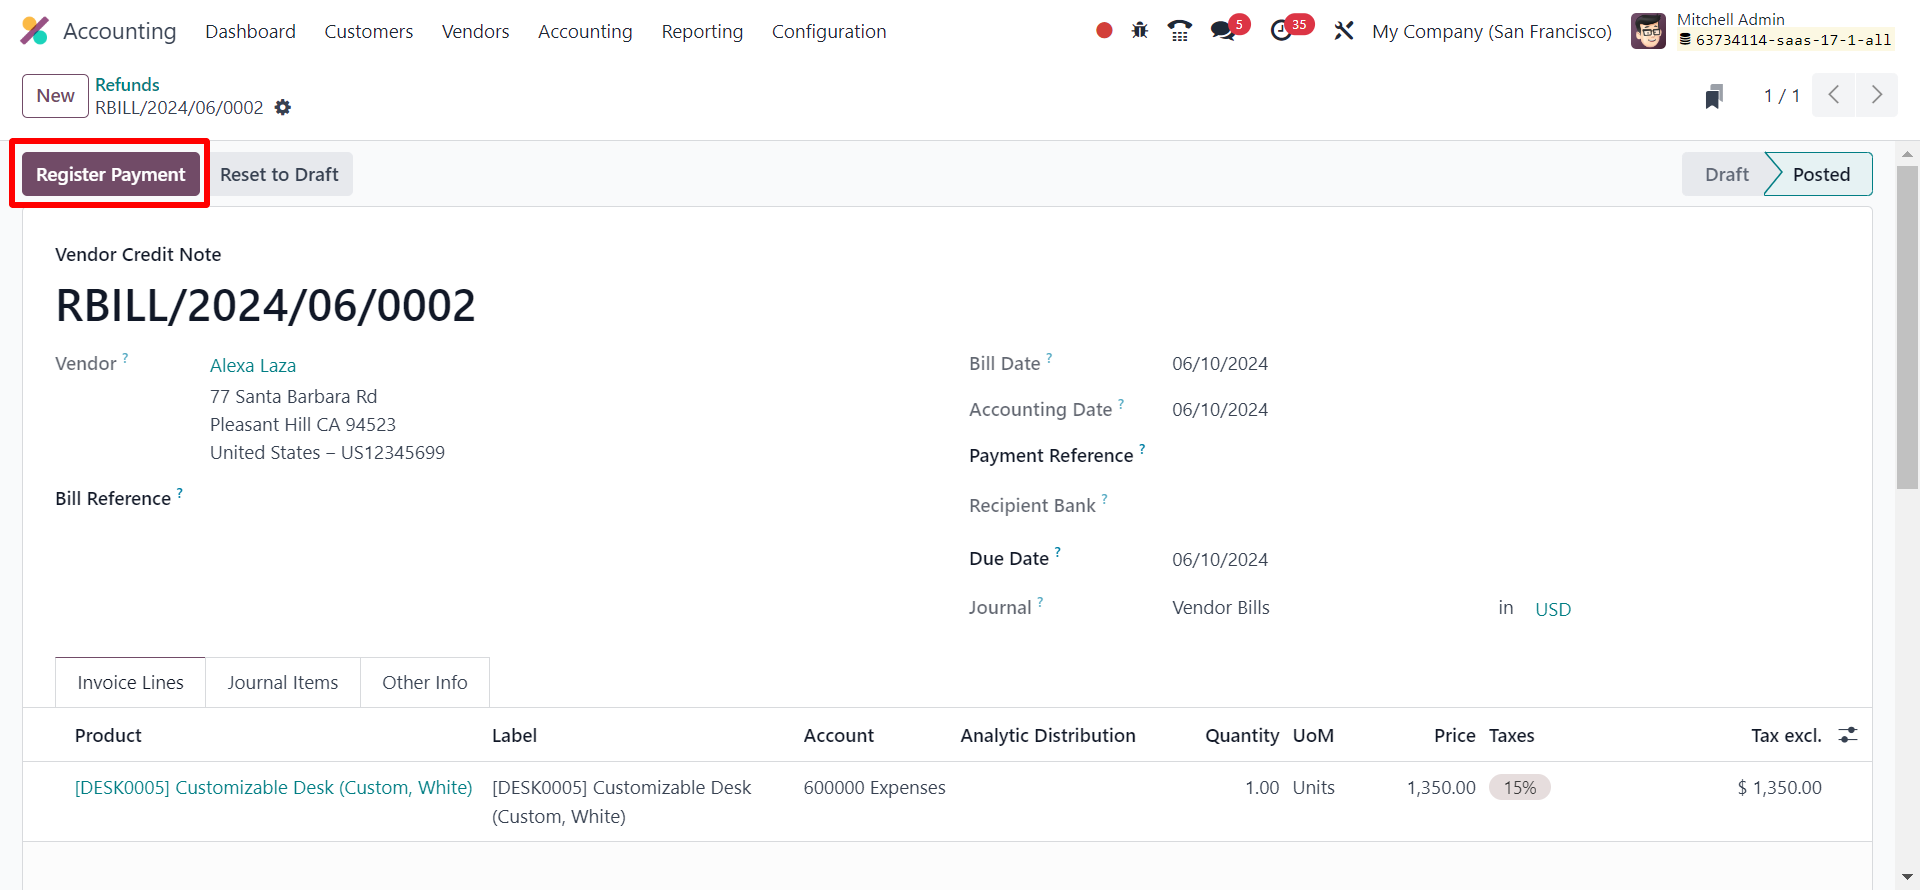
Then kindly go ahead and do the "Register Payment" and complete the process.
Odoo will automatically update the accounting records to reflect the refund transaction.
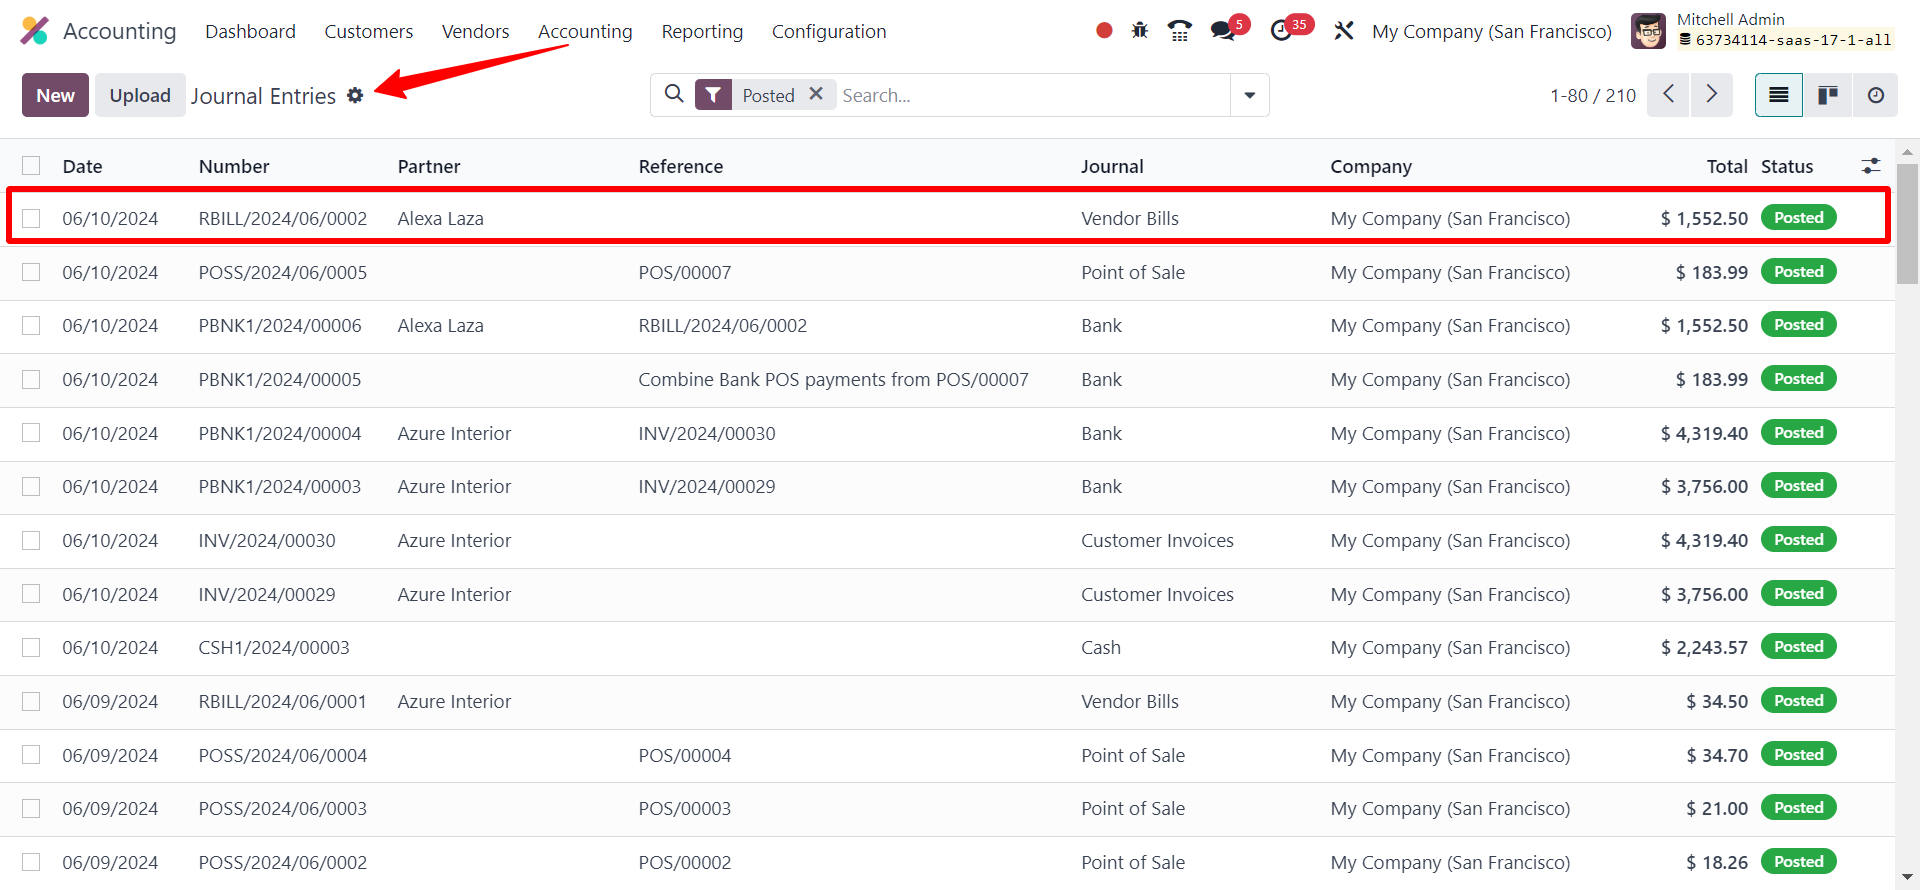
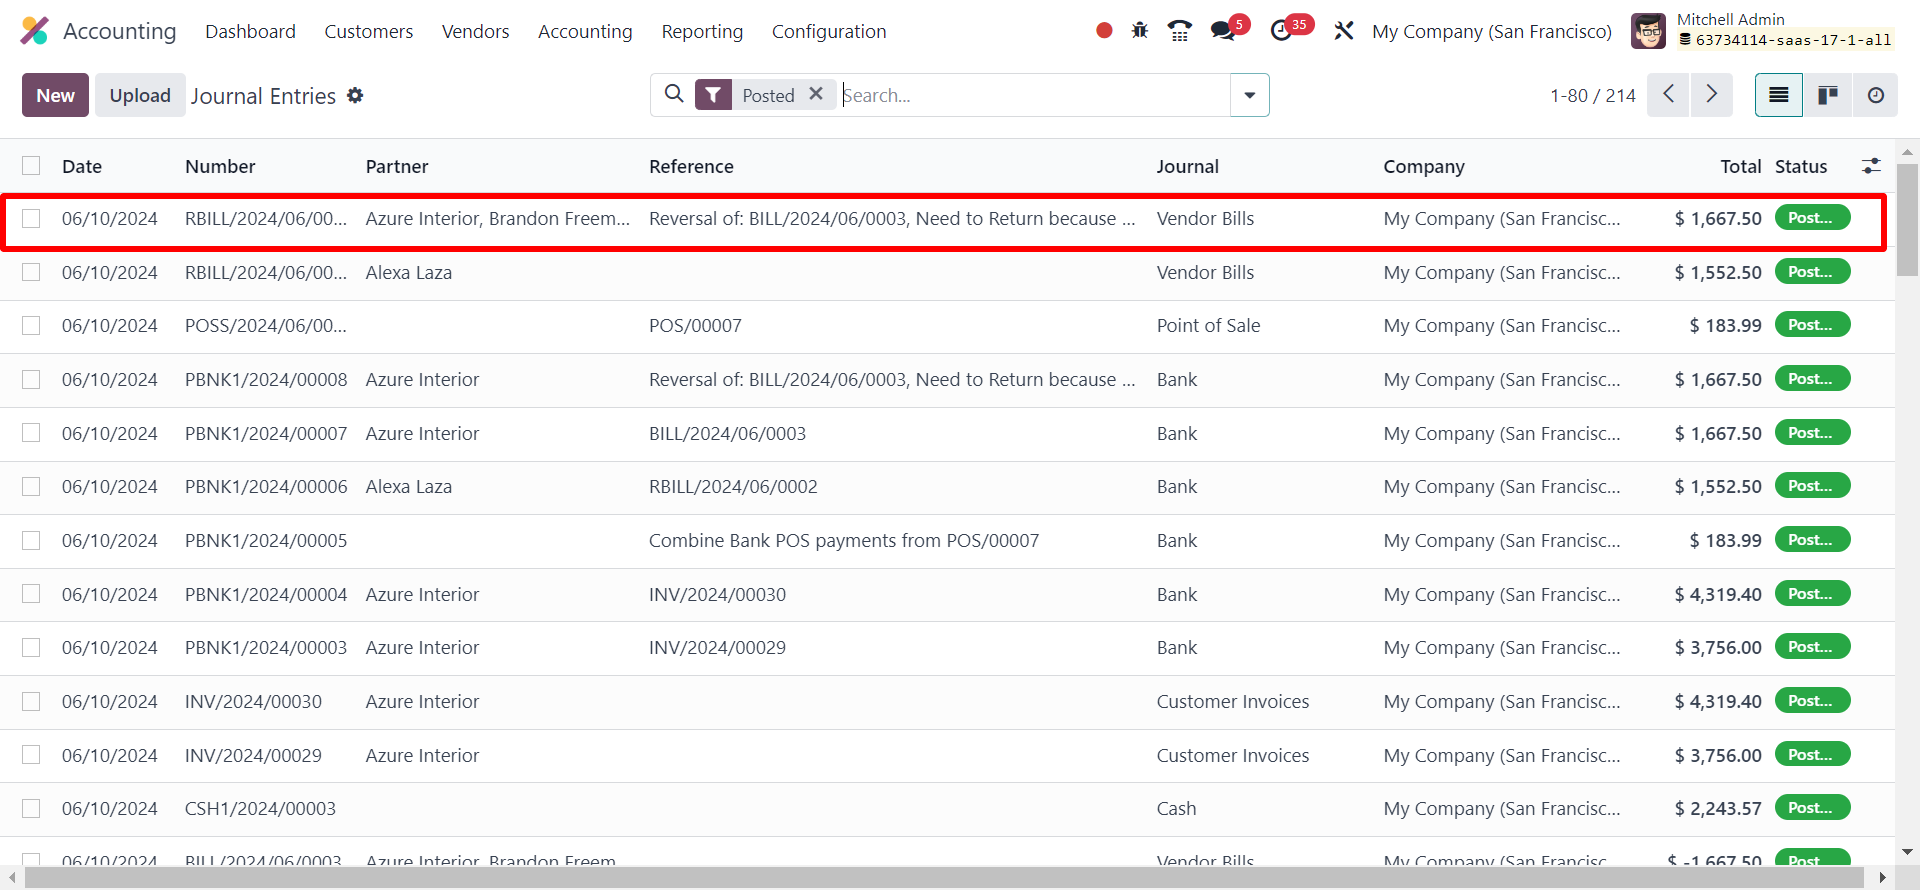
Review the revised accounting transactions to confirm the accurate processing and recording of the refund. Access the "Journal Entries" tab to locate the entry linked to reversing the bill generated for the refund.
2. Refunds from a Purchase Order in Odoo:
Now, let’s check how to generate refunds from a purchase order in Odoo 17. To generate refunds from the Purchase module in Odoo, you can use the "Credit Note" option available in the Vendor Bill. For this, Log in to your Odoo account and navigate to the Purchase module.
To start the process, draft a refund request for the specific product or service you wish to return.

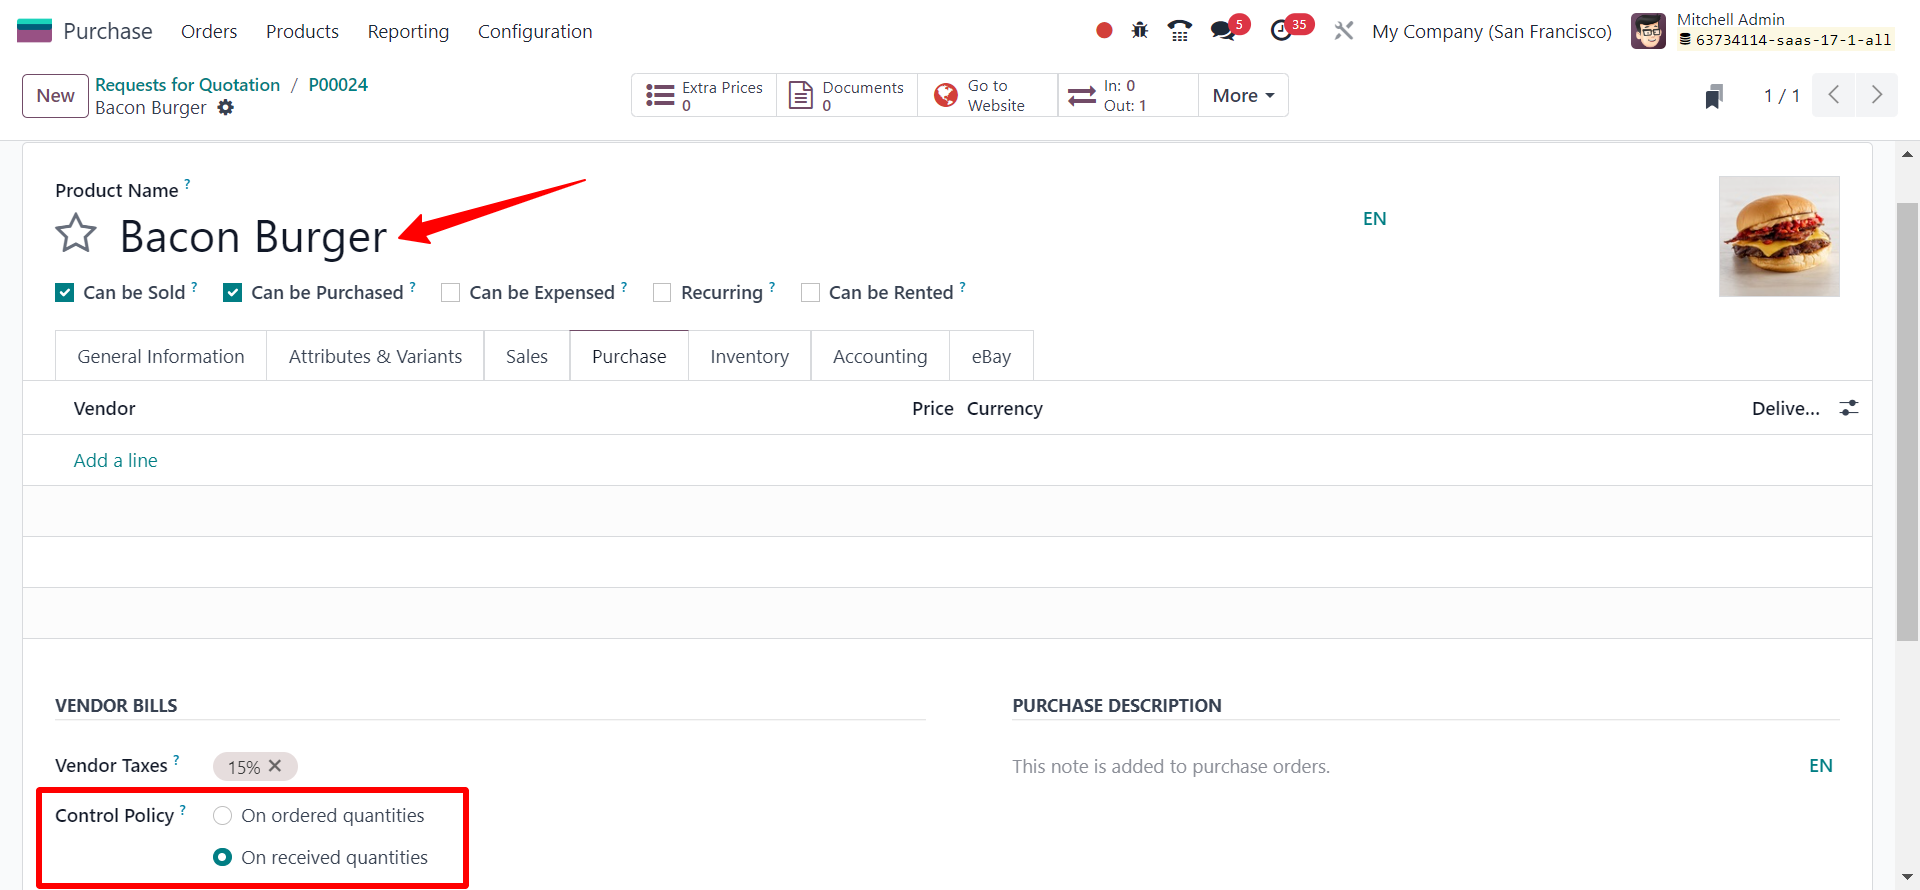
The control policy for the product you are opting to refund should be designated as "Based on Received Quantities."
Upon receipt of the products or services, it is essential to validate the receipt within the Purchase module.
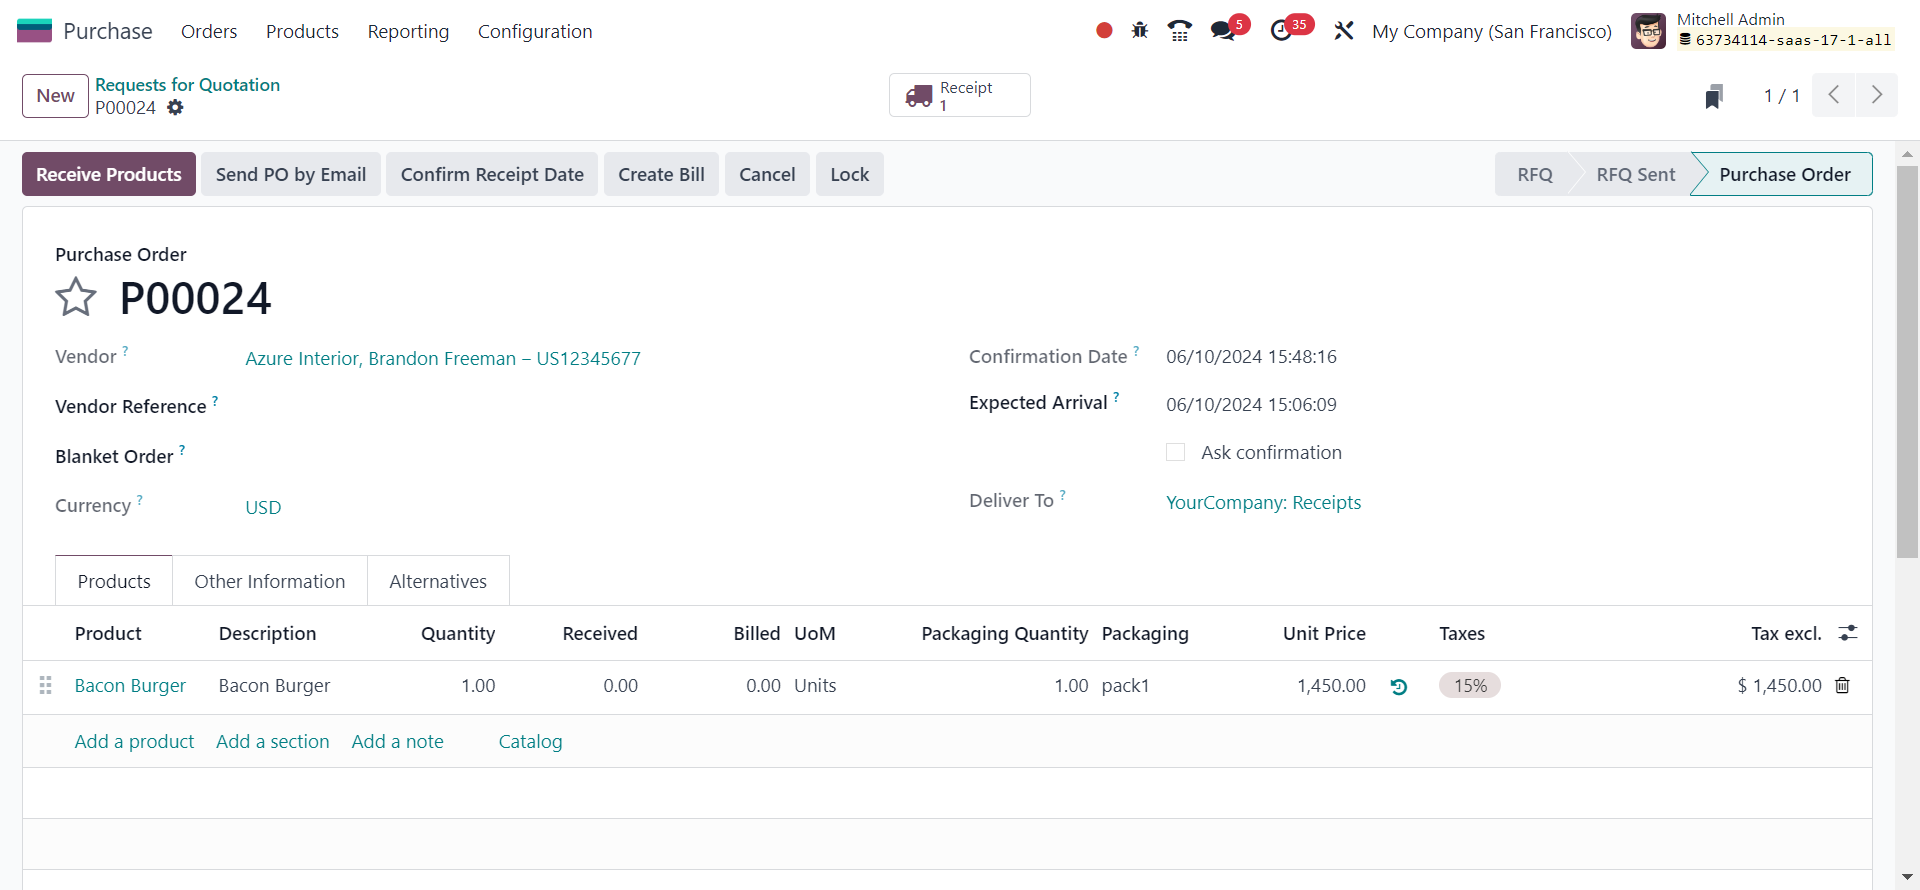
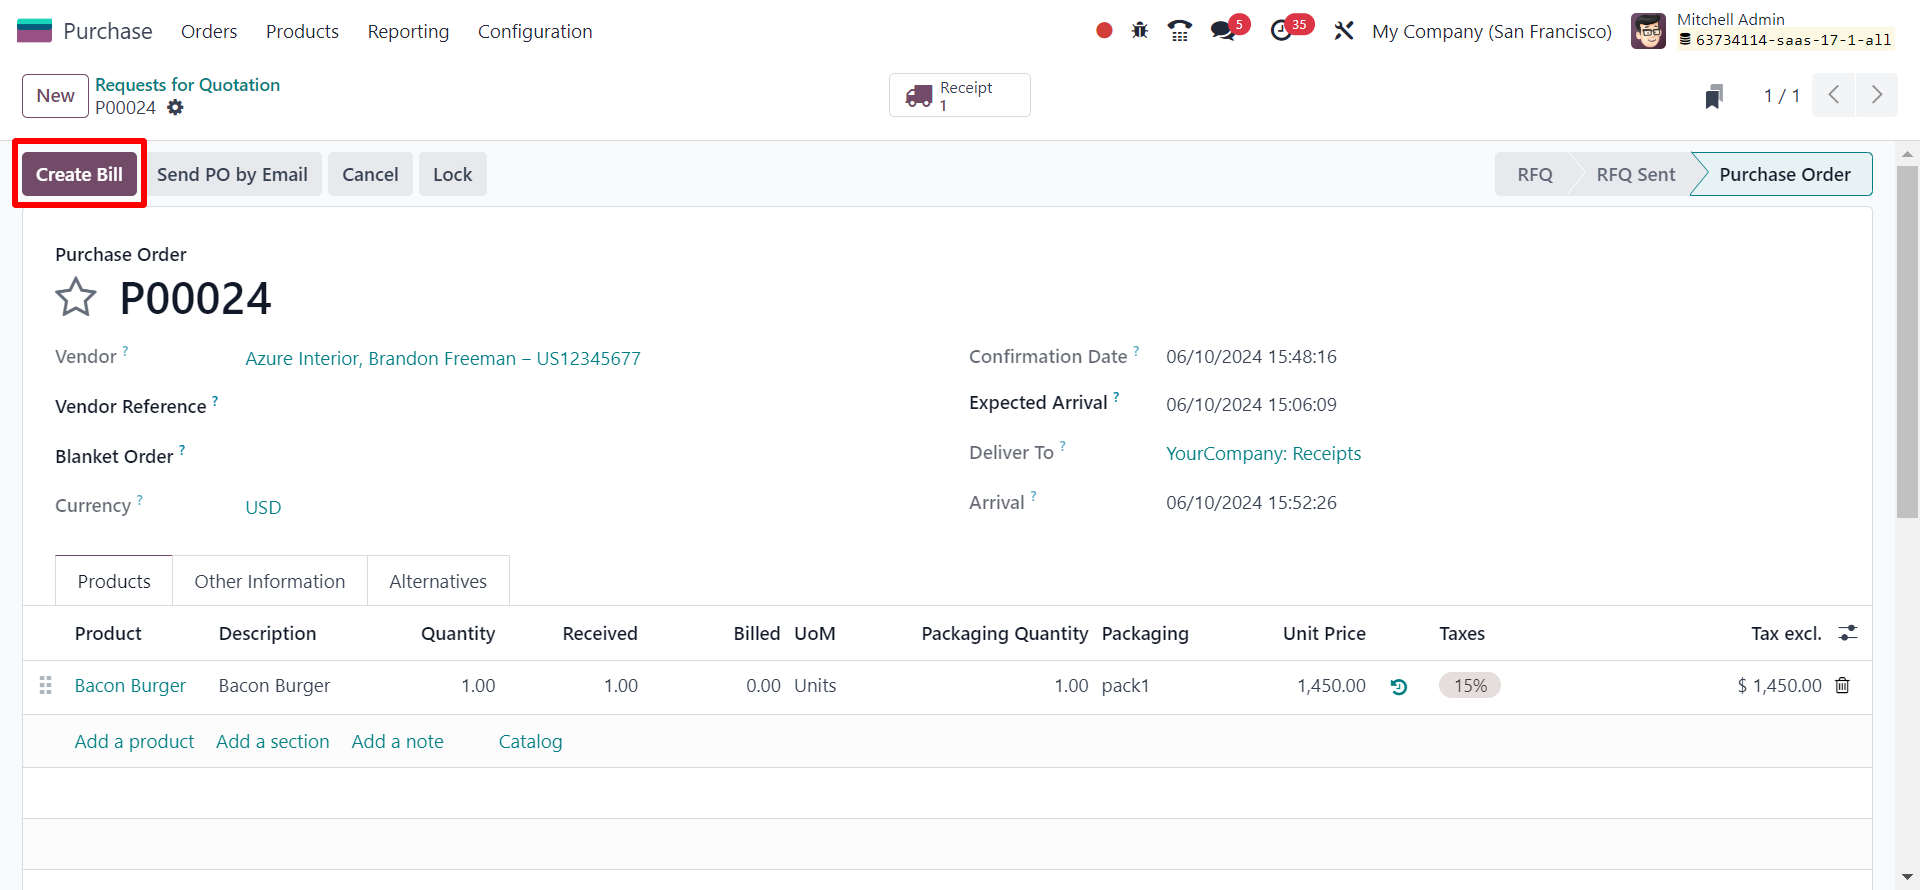
Create a vendor bill based on the received products or services. This can be done by selecting the corresponding purchase order and clicking on the "Create Bill" button.
Upon successfully completing the purchase and payment process, users have the capability to process a refund in Odoo for returning products attributed to defects, damages, or customer dissatisfaction. In instances of billing inaccuracies, such as incorrect quantities or prices on an invoice, users can generate a refund to rectify the discrepancy. Adjustments can be facilitated through the utilization of Credit notes or Refund invoices.
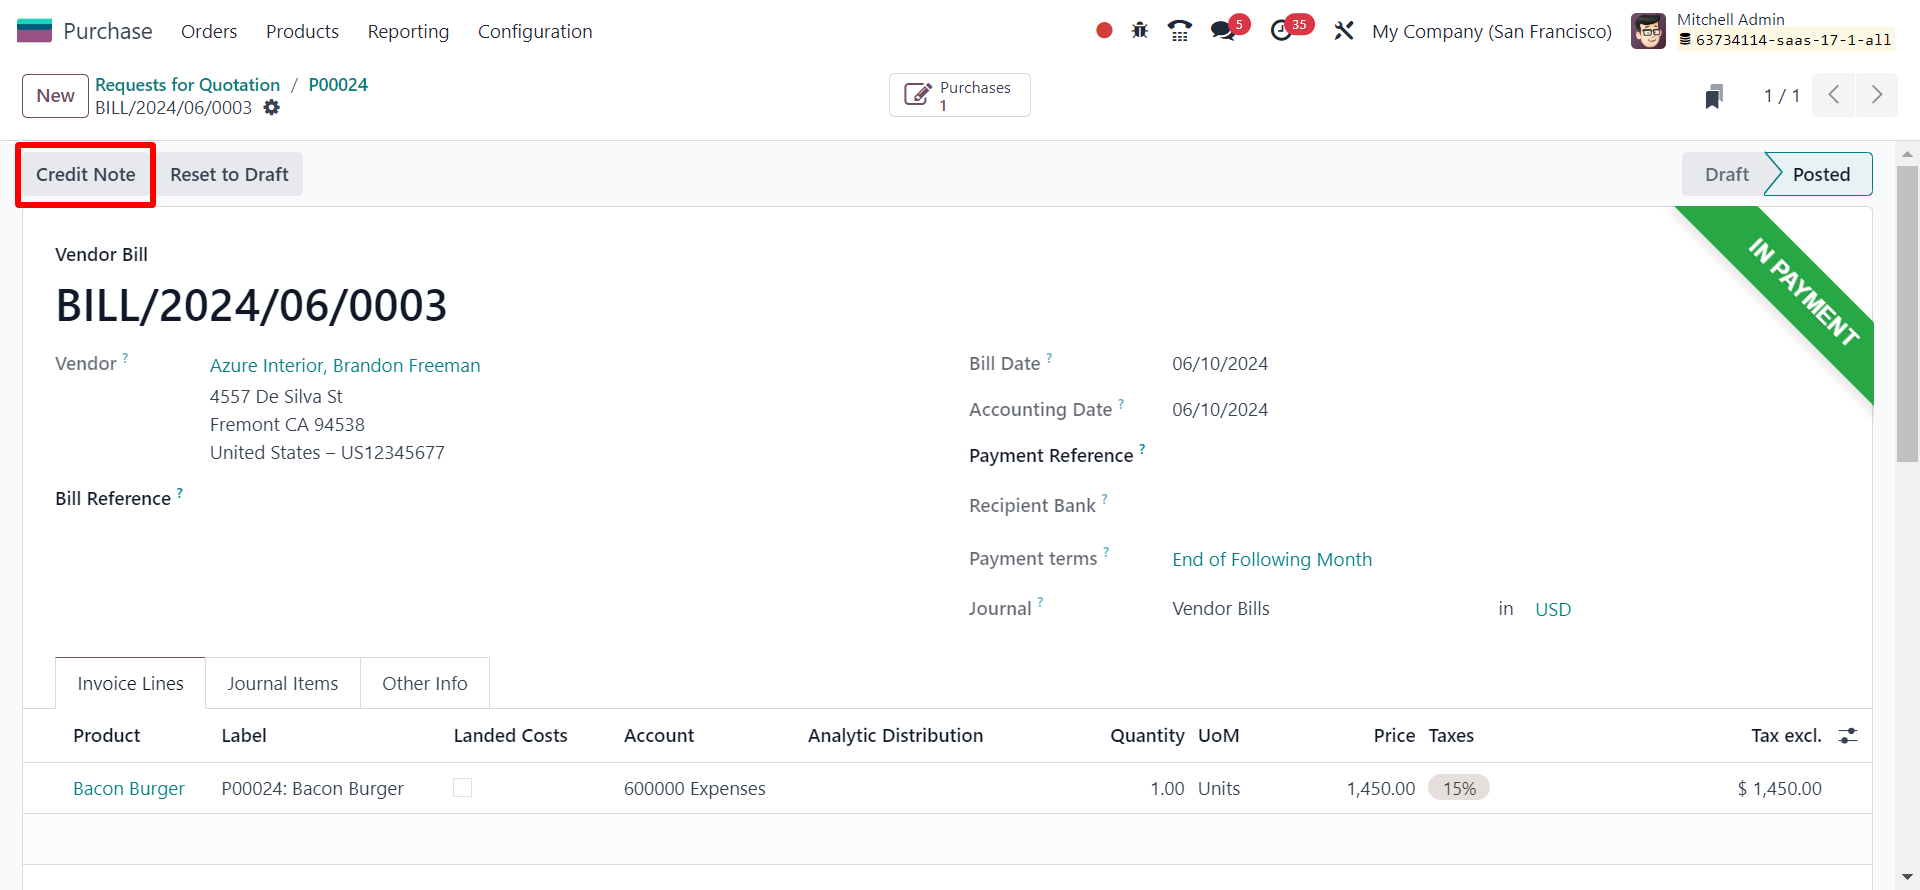
To initiate a refund within the Vendor Bill, locate and select the "Credit Note" option. This step is essential for initiating the refund process. Proceed by clicking on this option to open a new pop-up window.
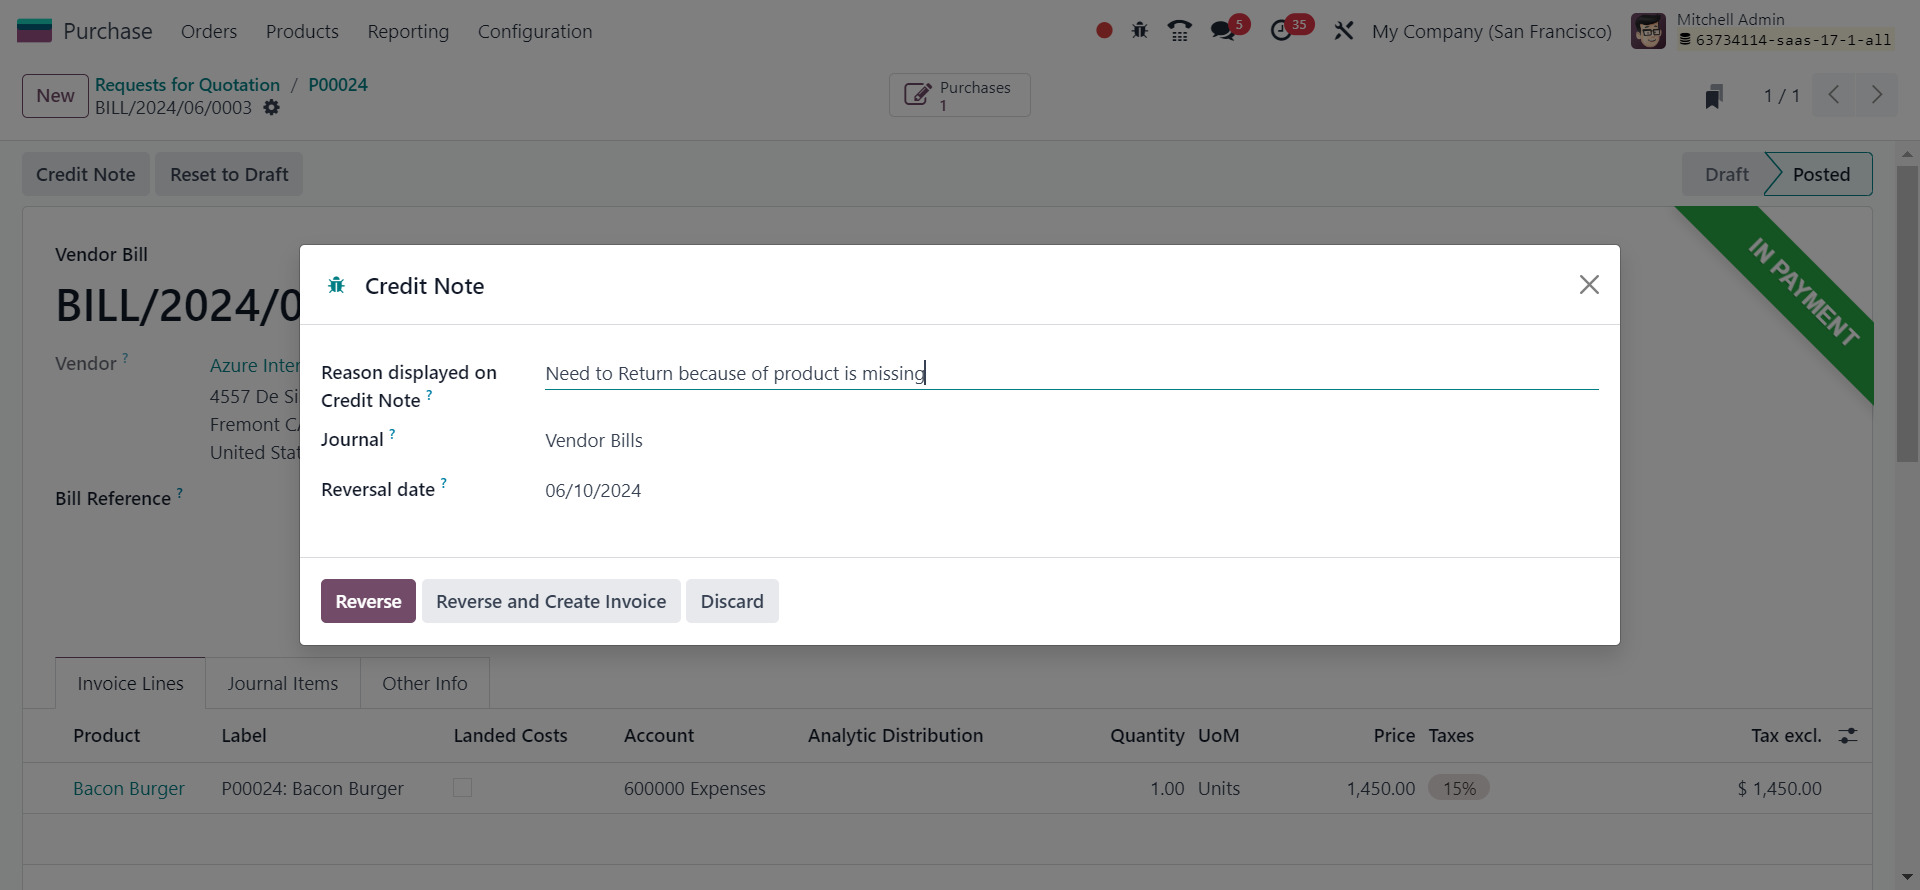
Enter the essential information for the credit note, like the reason, Journal, and Reversal Date. Finally, click on the "Reverse" button to continue.
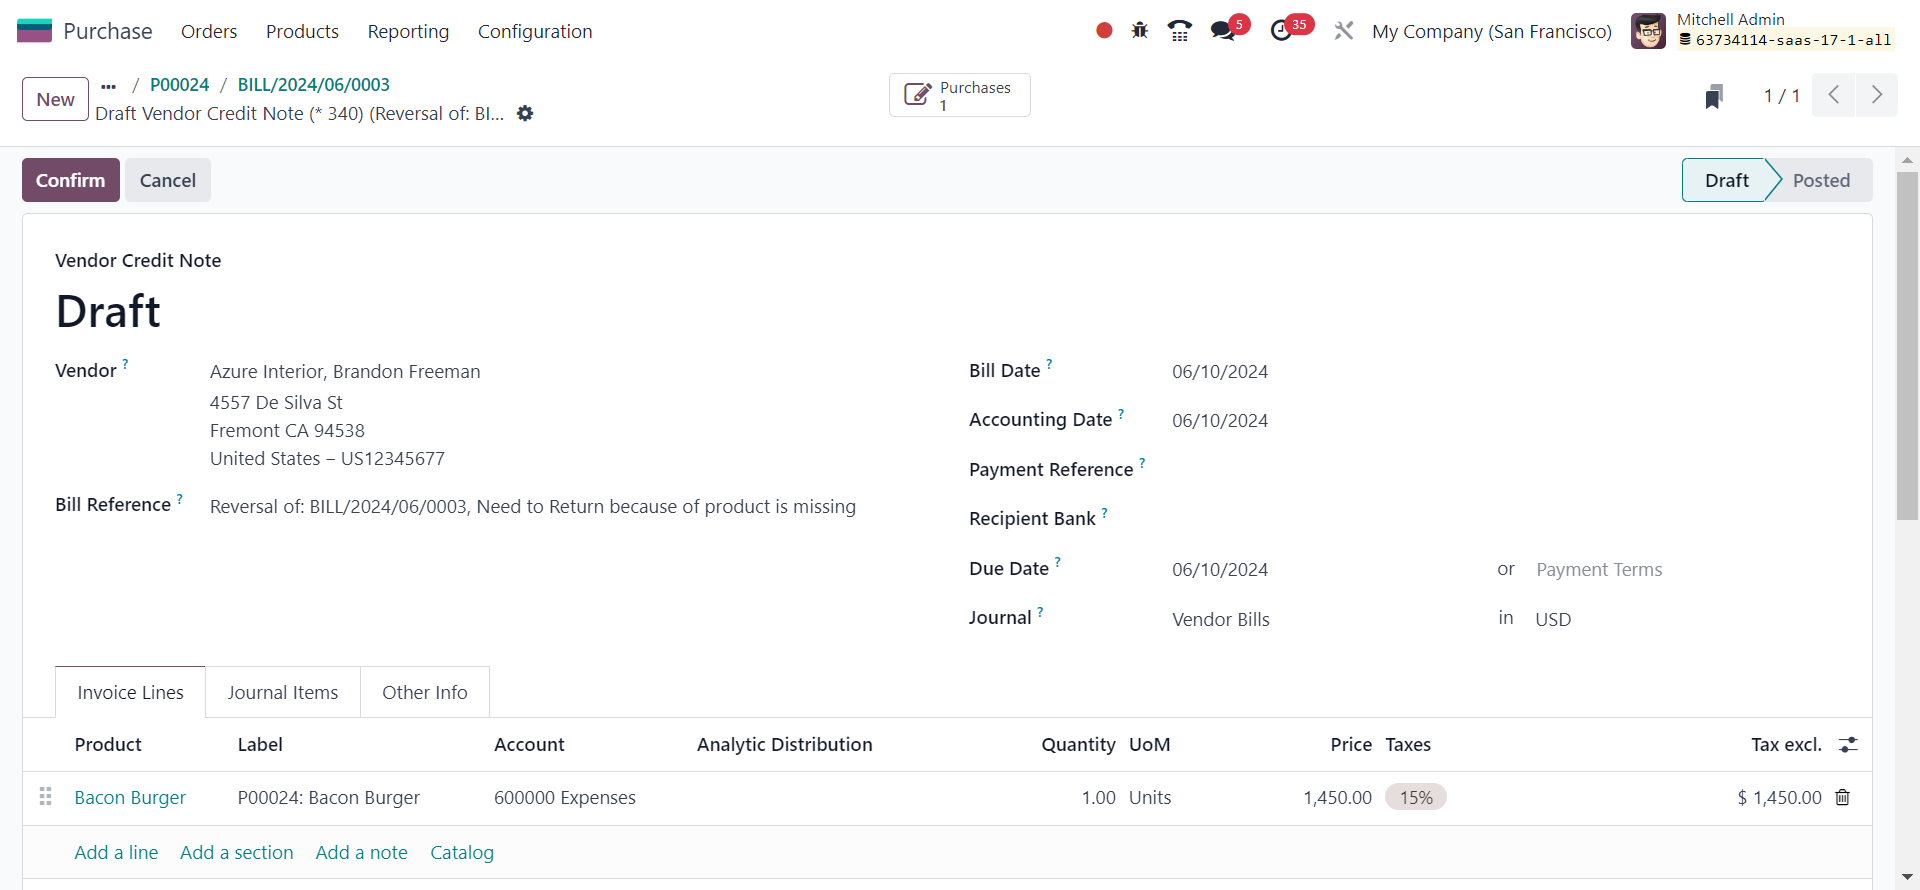
Proceed by generating a vendor credit note based on the provided information. Once completed, Confirm and Validate the credit note to execute the transaction. This will trigger the creation of the Reverse Bill associated with the initial vendor bill.
Confirm that the credit note has been successfully issued and the refund has been processed. Validate the updated data in the accounting records.
To efficiently process refunds for specific transactions in Odoo, you can make use of the "Credit Note" feature available in the Vendor Bill section of the Purchase module.
When you check the Refunds menu in the Accounting module, you will be able to see all refunds generated in Odoo from different platforms.
Efficient management of refunds is essential for maintaining positive customer relationships and ensuring financial accuracy. With Odoo 17 Accounting, businesses can streamline the refund process, automate workflows, and enhance overall efficiency. By following the detailed steps outlined in this guide, your organization can harness the full potential of Odoo 17 Accounting for seamless and customer-centric refund management.